Fish Tank(ard)
An interesting piece that I thought would fit well within the museum is my horn tankard. This would work well as an artefact but with the new direction for my project I had to find some way to alter it.

Keeping with the purpose of the tankard; to hold liquid, I started thinking of ways I could incorporate something into it. Initially I thought of simply modelling a frothing foam head from some kind of mead or perhaps a made-up, medieval fantasy concoction. I liked the direction I was going but I felt it was too simple for this first test of my project idea. One of my earlier thoughts was an underwater scene within the tankard but I realised that it would only be visible from the top and that I would need it to be more like a fish tank. It then occurred to me that the tankard should become a fish tank(ard).
After only a few attempts, Zephyr had created a pretty realistic scan with only a few issues that could be fixed in Maya.

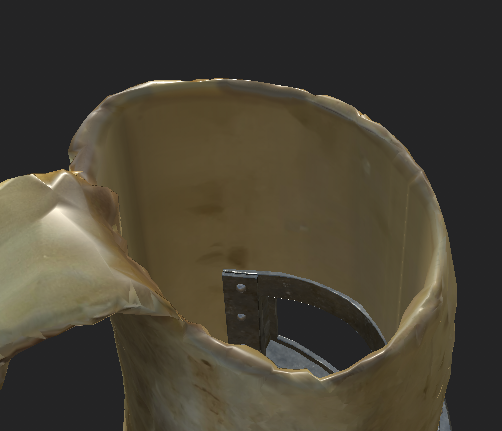
The main problems came from the underside of the model as it is difficult for me to get the camera at a lower elevation. Since the bottom is completely flat I can fix that easily in Maya and the texture issues on the undersides of the handle can be fixed in substance.

The other issue is hollowing out the centre as there was no way to get a good representation that this is a hollow object. There were also a few gaps at the mouth of the tankard but the rest of the model was such good quality that I opted to fix these issues manually rather than redoing it.

After getting the model into Maya I tested how low I could drop the polys without losing detail. This time I had to consider an estimate for how many polys would be taken up by the modelled part of this asset. Did I want them to be similar levels? Should they be proportional to the size? I decided to drop the tankard to a similar level as if this would be a standalone object in the museum. The final one ended up being around 9K.

An issue with the mesh around the top of the handle became more obvious as I started modelling with it. It looked unnatural and uncomfortable to hold so, after comparing it to the real object, I used the soft select tool to make the curve more realistic looking


After that I created the hole using a slightly warped cube and a simple booleans difference.

Using a duplicate of the cube I used to cut out the shape, I started added edge loops and moulding the cube to shape and curve of the tankard. Unfortunately, because the tankard is not a regular shape I had trouble lining it up all the time. This became a recurring issue.


I spent a lot of time on this model thinking about how it would be constructed. I chose to create two large plates that wrap the inside and outside of the tankard that would be held in place by the 4 reinforcement plates (2 inside, 2 outside).


I took a lot of inspiration from modern day gunships and submarines. They appear to be made up of lots of layered pieces and connectors with large bolts going through multiple layers at a time. The use of L shaped, bent/welded metal connectors with pieces sandwiched between also led to the creation of the fish tank's window piece.

I initially added too few edge loops to the curved edge making the frame look blocked and it stood out next to the higher poly tankard. To fix this I discovered the 'edit edge flow' tool. By adding an edge loop in the middle of each holding edge loop, selecting the new ones and using edit edge loop, Maya calculated the natural curvature of the object and places the edge loops in the correct position to even the curve.

I then bevelled all necessary edges at varying levels to add a hard-surface modelling look to the model. Some edges are have larger or more detailed bevels depending on their function or position on the model. Overall I am extremely happy with the construction of this frame.
Using another duplication of the cutting cube, I created the curved glass and assigned a place-holder texture on it. For the floor and water I used the fill hole tool to append the bottom edges of the tankards basin, extracted the faces and scaled them accordingly, again assigning place-holder textures.


I knew I wanted a plant of some kind in the tank to add some variation in the colours so I grabbed an image of seaweed online, separated one seaweed strand in photoshop and turned it into an alpha texture. I added it to a plane which I warped in various ways, with soft-select active, until I found a shape I was happy with. I scaled and rotated them into position to achieve the final result. As simple as this was I think it looks really good and adds a lot to the final model.


The fish tank wouldn't be complete without a fish inside it so I started work on modelling one. Having never modelled animals before this would be a challenge. I started with a sphere and stretched it along one axis to create more of an egg shape. I knew I wanted a large, flashy caudal fin on the fish so I extruded some faces from one side of the sphere and let the extrude tool's z-axis controls to determine the length. I merged the vertices along the faded end of the fin and, after adding some edge loops to curve the tail more naturally, I repeated the process on some top faces to create the dorsal fin.

The two pectoral fins and the anal fin could be achieved by duplicating one object for which I used a simple cylinder with multiple edge loops. By scaling and redistributing each edge loop I created a shape I was happy with. I also made sure that the fins ended at a point again.

I wasn't too concerned about a super high poly count on the fish since it wouldn't be inspected this closely but it has enough to still be a prominent part of the scene.
The head was the easiest part of the fish to create. For the gills I used the multicut tool to get the shape I wanted. Along the edge where the gills connect to the head I target welded the raised ones back to their original position. To create the flap I took the vertices on the body at the open side of the gills and pushed them underneath the extruded ones creating a layered flap on the side of the body.

The eyes were incredibly simple as well. Starting with a cylinder I selected the circular edge at one end, bevelled it and, after playing with the settings to get the right spacing, it was done. The edge loops on the bevelled side would also help me separate the iris from the pupil when texturing.

The mouth was even simpler than the eyes and ended up making the fish look a little bit in the style of sea of thieves. I grabbed two edges on the front of the fishes face and pushed them inwards ever so slightly to create something resembling lips.

The addition of the fish got me very excited about the final product for this asset.
To complete the scene I wanted to add a little fish tank ornament and decided to go for a chest. It is relatively simple but still has details that would be present if it were sculpted out of clay or some similar substance.

Finally I added some bubbles above the fish just for fun before I moved on to texturing and I think it goes well with the model.

The first thing I did in substance painter was correct the issues with the photogrammetry texture and the seam along the mouth of the tankard. Using the same methods I have used previously these were pretty easy to fix. Due to the patchy colouring of the tankard itself I didn't have to be too precise.

Once again referring to images of modern warships and subs, I chose the Iron Raw Damaged material as a starting point. The bumpy texture of the metal worked well with the style I was going for and seemed realistic for the creation of a warped piece of metal such as this. After adding some grime with two dirt generators I achieved the wear I wanted with more recent damages and older rusts.

For the chest I kept the damages to a minimum since this would be a painted ornament rather than being made of the represented materials. Using a slightly dulled gold material I achieved a slightly reflective golden paint effect and I used a scaled down walnut texture to make a blurrier wood effect as if it was hand painted. Using a basic brush of a layer with height information I was able to carve the keyhole into the lock.

For the floor I used this beach pebbles texture and after playing with the settings for a while I found a combination that worked well with the variety of stones shown.

I had to texture the fish in a many different stages as it was quite complicated. Starting with the body I used the Iron Diamond Armor material which has pattern settings changing the shape from diamonds to circles making the scale pattern.

I chose to add two colours to the fish but after painting on the second colour I realised the softness caused by the individual scales being multicoloured looked very unrealistic. After looking at references for multicoloured gold fish I noticed that their was no gradient to the scales. To fix this I had to pick a general pattern I liked using the brush and then manually change multicoloured scales to one of the two colours.

I later removed the scales from the head and underside of the fish using a mask. The scales being all over the body was also very unnatural and something that needed reference for me to notice.

The eyes were a simple gold material for the iris and a plastic material with full roughness and metallic to create a void effect.

The fins were the most difficult because it incorporated opacity into it. Using a mask I was able to successfully paint on where I wanted the transparent parts of the fin to be and then over the top I painted the thin bones of the fin array. This worked well for everything except the tail fin. There is a larger distance between the two sides of the tail fin because of the thickness of where it connects to the body. At first I thought I would have to alter the mesh but upon reviewing it from a distance I liked the effect it made as if there was some refraction/illusion created by the wavy nature of the fin itself. I also painted a fading colour to the dorsal fin wo that it would match with the body.

The parts of the fish without scales looked too smooth to me so I used the normals from the skin material to create some ridges to the flesh.

For a final detail I wanted some variation to the reflections and colours of the skin so I used my own pearl inlay smart martial and this iridescent filter to alter how the colours change from different angles and it created a unique, purple, oily shine on the scales. These changes are very subtle but I think it did improve the object.

After adding the completed model into UE4 I realised that I needed to use this normal creation website for the tankard and I think the result came out great. It perfectly recognised the frayed, weathered parts of the horn. I also realised that the model was too dark so I added a simple light to it that would only be present on the tankard.

I am very pleased with how this object came out as this was my first attempt at combining both workflows. I got to be really creative with it and I had a blast working towards this final product. The variety of items present in this rather than working towards one solo piece adds a lot more possibilities to my project.


Comments
Post a Comment